Squatting is a fundamental human movement pattern that involves nearly every muscle in the body. Squatting improves fitness, performance, and mobility for daily-life tasks.
Squatting is a fundamental human movement pattern that involves nearly every muscle in the body.
It’s handy for picking stuff off the floor, going to the bathroom, and just hanging out on a traffic cone.
 |
 |
 |
And thanks to exercise science, data show that squats are excellent for building strength, power and mobility. Full squats can help counteract many of the chronic musculo-skeletal problems we face today, such as weak glutes, hunched back, weak torso, etc.
If a person can perform a full depth squat with their own bodyweight, they’re probably a fairly fit person.
How to squat properly
1. Balance stability and mobility
The prime movers in the squat are the muscles around the hips and knees, but all joints below the belly button (hip, knee, ankle, foot) and most of the spine need both stability and mobility to squat properly.
If any of these areas are unstable or immobile, this can cause squat problems. The table below shows both optimal and faulty patterns for each body part involved.

2. Keep hips mobile
Muscles around the hips help stabilize the pelvis and knees during squats.
If someone lacks hip mobility, they will often lean forward too much when squatting (stressing the spine). Or they will initiate the squat by “popping the butt” up too quickly.
3. Knees follow toes
When squatting, keep knees stable, in line with the hips and feet.
When the knees flare out or cave in (beyond a couple degrees), tendons and ligaments become vulnerable and work extra hard to resist awkward forces. This is probably why young athletes can “get away” with ugly squats (but this catches up with them as they age).

Make sure knees follow the direction of the toes. If your toes point out while squatting (which is a normal variation, especially for women with wider pelvises), so should your knees.
Don’t panic if the knees go slightly over the toes, as this can help to ease the movement for the lower back. What’s most important is that your hips are back, behind your heels.
The “squats hurt knees” myth
Many trainers used to recommend against full-depth squats, claiming that it caused knee injury. While forces on connective tissues of the knee increase during a squat, this does not lead to injury.
Squatting to full depth — where hamstrings touch calves, or slightly above — does not make knees looser or strain ligaments. In fact, full-depth squatting probably increases knee joint ligament stability.
There are low rates of knee injuries in competitive weightlifters who often perform deep squats for countless reps each week.
Shear versus compressive forces (or, why leg extensions aren’t a good substitute for squatting)
One key reason that full squats do not hurt knees has to do with the difference between compressive and shear forces.
- Shear force is sideways force. In the case of the knee, shear force would be loads that go crosswise to the shinbone — such as leg extensions (in which the machine’s pad sits on the shins and presses perpendicular to them).
- Compressive force is downwards force. In the case of the knee, compressive force would be loading along the length of the bone — such as in a squat.
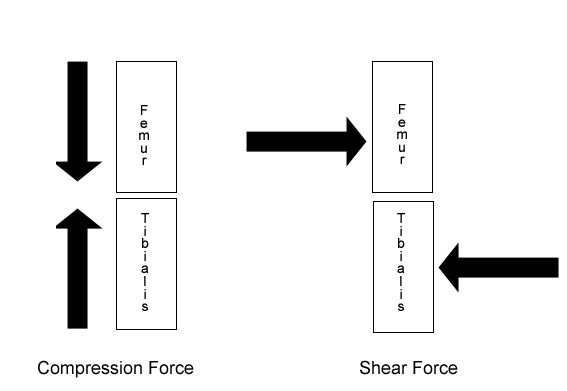
Here’s the important point: Joints are better able to withstand compressive forces than shear forces.
In addition, with squats, many muscles fire at once, which also helps to protect the knee joint.
During leg extensions there is only quad contraction and with leg curls there is only hamstring contraction. This can displace the tibia and stress the anterior & posterior cruciate ligaments (ACL & PCL).
However, during squats, both the quads and hamstrings contract. This helps to balance out the tibia in relation to the femur. This keeps the ACL and PCL happy and healthy, and can also help rehab damaged ligaments.
Along with loading, shear and compressive forces increase with:
- fatigue;
- poor technique;
- faster rep speed; and
- more resistance.
What does this all mean?
- Full depth squats, done properly and carefully, at an appropriate speed, are safe.
- But you might want to quit doing those heavy leg extensions.
4. Keep ankles mobile and feet planted firmly
Ankles help with support and power generation during squats. Limited ankle mobility can lead to the heels coming off the floor, foot pronation (outside of the foot elevating) and the knees caving in.
Remember to choose footwear that allows you to push through the mid-foot/heel. In general, running shoes are not good squatting footwear — they’re too squishy and don’t provide enough support.
Instead, wear thin-soled shoes (such as Chuck Taylors) or hard-soled shoes (such as Olympic weightlifting shoes). Or, go barefoot (or wear Vibrams).
 |
 |
| Pronation from weak/immobile ankles | Arnold and Co. model squatting footwear |
5. Keep spine neutral and chest “proud”
Remember the mobility-stability balance? For a good squat, you need lower back stability and upper back mobility.
The angle of the torso should remain relatively constant during a squat (as upright as possible, limiting forward lean). This doesn’t mean straight up-and-down, but rather keeping a natural arch in the spine, folding from the hips (rather than rounding or hunching), and keeping the chest “proud”. As hips go back during the descent, torso will naturally lean forward slightly to compensate.
With an unweighted squat, it’s all right if the lower back slightly rounds in the bottom position. When you add resistance, especially with a barbell (which pushes the thoracic spine more into extension), you’ll naturally straighten out a little bit. Simply focus on keeping the spine neutral (i.e. a natural S-curve) with minimal rounding.
The lower back is often the weak link for weighted squats, especially in someone with longer legs and a shorter torso. If you are tall and/or have long legs (in relation to your torso), you may have trouble staying upright with standard barbell back squats. Try a wider stance and/or front squats.
Biomechanics geeks, check out: How Leg Length Affects Squatting
The erector spinae muscles are critical during squats, as they help resist vertebral shear forces. They can be strengthened (along with other torso muscles) by doing more squats.
Forces on the spine while squatting with heavy weights can be quite high, beyond what most biomechanics equations predict we’re able to support. But the spine adapts over time to increased loads.
In the image below, you can see:
a) lumbar flexion
b) thoracic extension
c) neutral spine.
Ideally, you’re looking for (c).

Learning to squat
If you have stiff ankles, immobile hips, a weak torso, discomfort, and strange noises in your joints with squatting, then you likely have a faulty movement pattern that needs adjustment.
If squatting results in acute pain, or you lack the mobility/strength to do one properly, swallow your ego and modify the movement (see squat progressions below).
Full depth squats are often safer than shallow squats because it takes less external resistance (and less stress on the joints) to create the same stress on the muscles (thanks to lever arms). This makes full depth squats ideal for most people.
Exceptions include:
- knee rehab (which should progress to full squats, in most cases);
- extremely long legs in relation to torso; and
- folks who have specific partial-squat-related goals, such as athletes training jump squats.
 |
 |
| Full squat | Partial squat |
Squat progressions
However, most adults in Western cultures (where people sit instead of squat) don’t squat well when they start. They’ve often lost their natural childhood ability to drop down easily on their haunches.
Thus, many folks have to re-learn how to squat properly.
Here’s a basic overview of the movement.
Start standing, with good posture. Feet can be anywhere from close together, with toes pointed forwards, to wide, with toes pointed out. Experiment and find which foot placement works best for you.
- Take a deep breath, lifting the ribcage.
- Keeping this “proud chest”, push the butt back first and then sit down. (Imagine sitting down in a chair that’s not there, or sitting down on the toilet.)
- Let the torso tip forward naturally from the hips as the butt shifts back.
- Keep heels down.
- Go down until your hamstrings touch your calves. (Or as far down as you can go, for starters.)
- Drive through the heels, and keeping chest “proud” and head up, ascend.
Here is a helpful step-by-step progression for learning the squat: Lurn To Squat Good — E-Zy!
Squat variations
The squat isn’t a single exercise — it’s an exercise concept. By mixing up the loading (overhead, front, back, dumbbells held at the sides, etc.), form (1 or 2 legs), speed, foot placement, etc. you can have a hundred (or more) variations on the basic idea.
Plate squats
Plate squats encourage upright posture and appropriate load distribution. Hold the plate parallel to the ground. If the plate tilts downwards, you’re probably rounding your back.
To be a real hardass, try balancing a ball on top of the plate, as shown in the photo below.
Use a light plate. You aren’t doing this movement to show off for gym peeps.

Goblet squats
An option for those who have trouble with standard squats, as well as a great warmup or beginner squat variation.
Back squats
In the classic back squat, the barbell sits on the traps/upper back, not on the neck.
Jump squats
If you want a powerful leg contraction, jump.
Adding resistance to jumps can increase power output and jump height. When it comes to optimal jump squat form, thighs usually don’t go below parallel.
To load the jump, weighted vests are ideal. You can also hold dumbbells, though it’s somewhat more awkward. Barbell and Smith machine jump squats tend to be the most dangerous, because of the loading on the spine.
https://www.youtube.com/watch?v=SKz9YNNuH0Y
Zercher squats
An option for those who have trouble with standard squats. Also handy as sport-specific training for wrestlers, especially if you use a sandbag instead of a bar.
Front squats
In the front squat, the weight sits at the top of the front of the shoulders, in the “groove” between deltoids and collarbone.
Because the torso stays more upright in front squats, this style of squatting minimizes compressive forces on the spine and knee joints.
If the barbell begins rolling forward from the shoulders, there is a lack of mobility and/or torso strength. Many people think wrist range of motion is the limiting factor here, but it’s usually tight internal shoulder rotators (pec major, lats, teres major, subscapularis). Work on keeping elbows high throughout the movement.
See also the table below for front squat errors and corrections.

Overhead squats
Great for developing full body mobility, balance, and strength. Plus it just looks cool.
1-leg squats
When you’ve mastered two legs, try one. Working one side at a time can increase demands from supporting hip muscles.
Shrimp squats
Summary & recommendations
The squat is a basic human movement. Performing it makes you better at athletics, fitness, and life in general.
If you want to get better at the squat, practice. Practice helps to coordinate movement, and builds the mobility you need to do the movement properly.
Start with a squat progression, such as squatting down to a step. Make it your goal to get as full a range of motion as possible — even though this may take time.
Every body type is different. Try a variety of squats, stances, and ranges of motion.
Focus on form and proper technique, not piling on weight to impress your gym buddies. Check your ego at the door.
Do your mobility drills. A body with poor mobility is a body that will likely get injured with squats.
Full squats are often safer than shallow squats. The deeper you go when squatting, the more muscles recruited.
Control the descent and reverse the movement carefully. Don’t rely on your ligaments to bounce you out of a deep squat.
Think about how the squat helps your fitness and performance — don’t focus too much on how much you can lift. The squat technique that allows you to lift the most weight isn’t necessarily the best or most appropriate option.
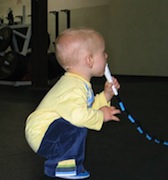
Keep it simple. Even babies can squat. Don’t over-think it.
Troubleshooting the squat
When you’re working on learning the squat, try snapping photos or videotaping yourself. This can provide invaluable feedback.
Trouble getting a comfortable squat pattern?
- Try a wider stance, with toes pointed out a little (remember knees follow toes).
- Use natural foot positioning (similar to other athletic movements), with toes slightly out.
- Keep heels on the ground. If need be, put small plates under your heels until you develop better mobility in hip and ankle joints.
- Control squat speed, using a 2-3 second descent (unless your sport/activity demands another style).
- Maintain a neutral spine.
- Take breaks — fatigue can result in poor mechanics.
- Keep your hands close to your body.
- Look forward and keep your head up.
- Work on mobility drills for ankles, hips and the thoracic spine (All About Dynamic Joint Mobility).
- Use squatting progressions (see above).
- Get a coach who can help.
Trouble keeping the weight on your heels?
- Build hip mobility.
- Build core stability.
- Build ankle mobility.
- Build thoracic spine mobility (All About Spine Health).
- Take off your shoes or get a thin soled shoe.
- Keep your chest proud and core tight.
Trouble squatting deep?
- Get your body warmed up (All About Warming Up).
- Widen your stance and rotate your toes out.
- Think about squatting between your legs.
- Build ankle, thoracic spine, and hip mobility.
- Build core stability.
- Start the squat by sitting your hips back.
- Try box squat progressions (high to low box).
- Drop the amount of resistance you’re using.
Do your knees cave in during squats?
- Place a light band around knees as a guide (video).
- Strengthen the hip abductors/glutes.
- Focus on keeping the knees out and “spreading the floor”.
- Drop the amount of resistance you’re using.
For extra credit
 The squat has been shown to be effective during the rehab process of cruciate ligaments and/or patellofemoral injuries, with the most effective range of motion between 0 and 50 degrees of knee flexion (see image at right). The vastus medialus oblique (VMO) tends to be activated more during partial squats.
The ultimate tensile strength of the patellar tendon is about 10,000 to 15,000 N. The highest recorded compressive forces were obtained in a study of powerlifters lifting 2.5 times their bodyweight – about 8,000 N at full squat depth.
The greatest risk of injury with full depth squats is probably to the menisci and articular surfaces of the knee rather than the ACL/PCL.
Strong hamstrings can help to increase knee stability during the squat.
Stress on the knee ligaments can be decreased by keeping the heels on the ground
Peak quad involvement during squats is from the upright position down to 90 degrees knee flexion. Beyond that, the hamstrings and glutes contribute most.
Foot placement (toes in, out, straight) doesn’t seem to influence muscle activation. Only a very wide stance incorporates more of the adductors.
References
Click here to view the information sources referenced in this article.
Learn more
Want to get in the best shape of your life, and stay that way for good? Check out the following 5-day body transformation courses.
The best part? They're totally free.
To check out the free courses, just click one of the links below.


Share